Difference between revisions of "Zero-K:Developing"
GoogleFrog (talk | contribs) |
GoogleFrog (talk | contribs) |
||
| Line 74: | Line 74: | ||
== Modifying lobby menu == | == Modifying lobby menu == | ||
| − | + | Follow the instructions in 'Getting sources' with the following adjustments: | |
| − | + | * The repository that you want to edit is https://github.com/ZeroK-RTS/Chobby. | |
| − | + | * It is best to call the folder something like 'zkmenu.sdd', to avoid confusion. | |
| + | Make sure that the 'Directory:' field ends in '.sdd'. You should end up with something like this: | ||
| + | |||
| + | [[File:zkmenufolder.jpg]] | ||
| + | |||
| + | To test your changes launch Zero-K.exe with the <tt>dev</tt> arg (i.e. <code>Zero-K.exe dev</code>). On windows this is best done by creating a shortcut and changing the target, as shown below. | ||
| + | [[File:targetZK.jpg]] | ||
== Zero-K.exe launch flags == | == Zero-K.exe launch flags == | ||
Revision as of 23:07, 27 May 2019
New developers should read this before touching the source.
Contents
ZK's Devving Philosophy (social rules)
- "War is a product of anticommunication"
- Communicate with other devs about your changes/fixes, let them understand the issue. Do not make 'random' changes.
- "Do not create work for other people."
- Have responsibility for your changes/commit. Do not leave bugs that require other people to fix.
- "Readability & performance are equally important."
- Optimize code but not to the point of unreadability. Remember the rules of optimization:
- Don't.
- Don't (yet).
- Profile before doing it.
- Optimize code but not to the point of unreadability. Remember the rules of optimization:
- "If it ain't broke, don't fix it."
- Don't code fixes that nobody wants to problems that don't exist.
What is in source codes
- Zero-K contains the game proper
- units folder contains unit definition files
- You can read the wiki about game development for Spring Engine
- units folder contains unit definition files
- Zero-K-Infrastructure
- Zero-K.info: Website sources
- ZkLobbyServer: Lobby server (for MP)
- ZkData: Website/server database structure
- Chobby contains the lobby client
- Zero-K-Artwork contains sources for 2D art, 3D art and sounds
- SpringRTS-tools contains various dev tools
- Upspring - required to edit the .3do and .s3o model files used in the game
- MapIconBuilder - unit map icon sources are here
- Zero-K-Missions contains source files for official ZK missions
Getting sources
This is a guide to downloading Zero-K sources from GitHub using TortiseGit. The game sources are used as an example, however this method applies to other subprojects as well.
- Install TortiseGit.
- Create a GitHub account.
- Log in to GitHub and Locate the repository you want to edit.
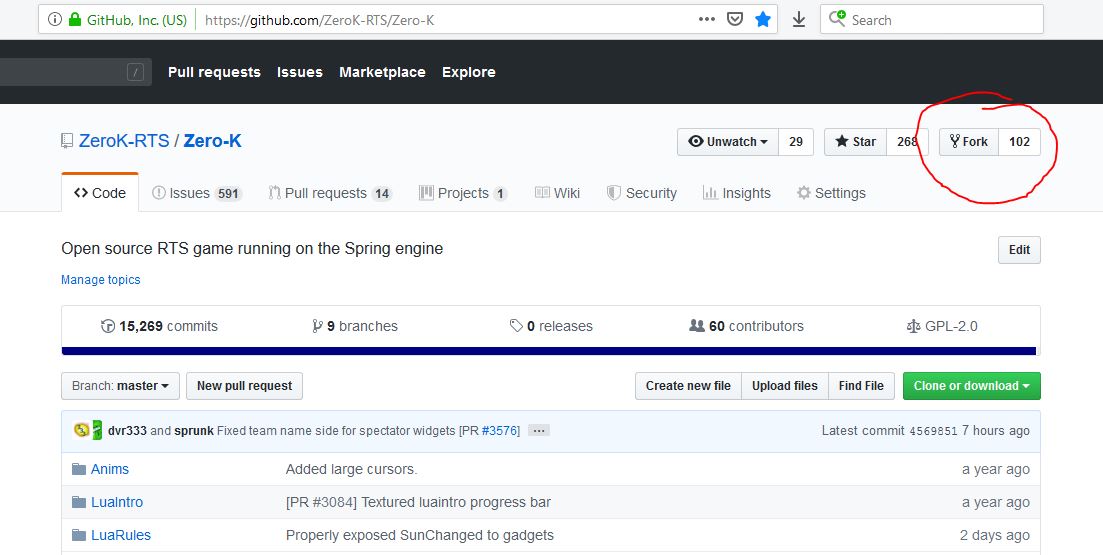
- Click the "Fork" button on the GitHub website to create your own copy on GitHub.
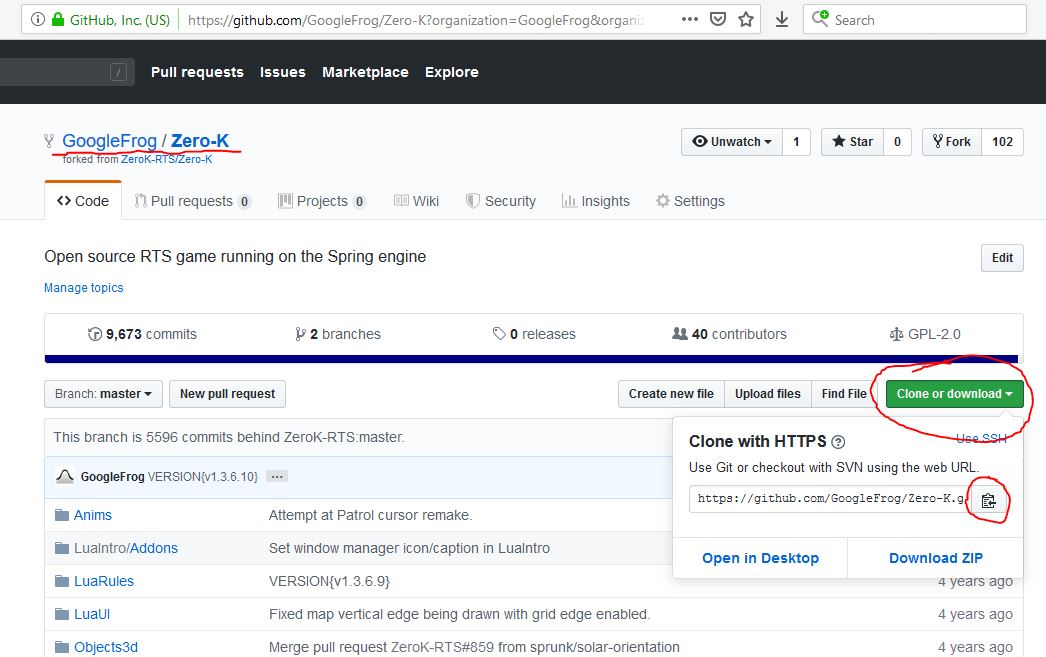
- Locate your fork on GitHub and click "Clone or Download".
- Copy the web URL to your clipboard.
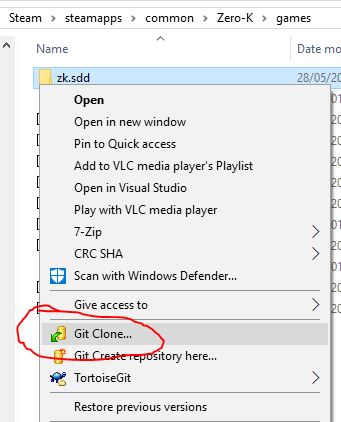
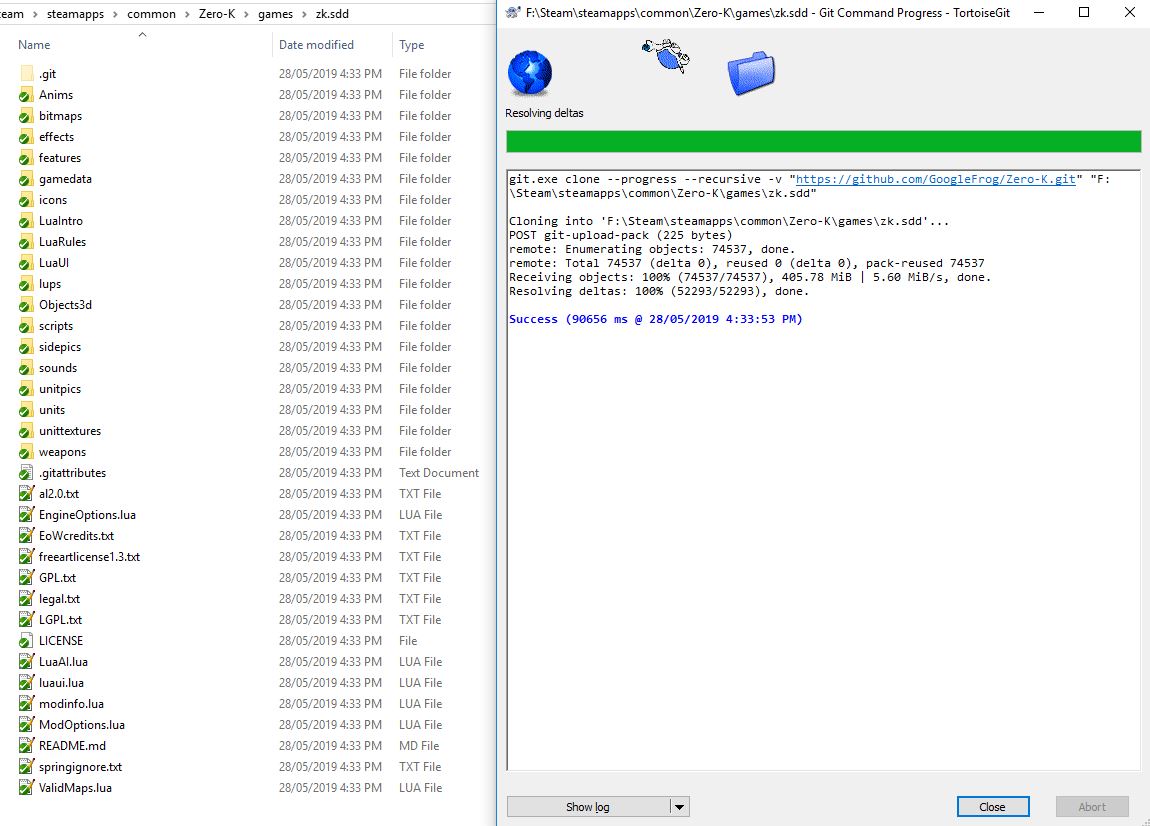
- Create a folder called 'zk.sdd' in your Zero-K install under games.
- Right click on 'zk.sdd' and select 'Git Clone...' from the context menu.
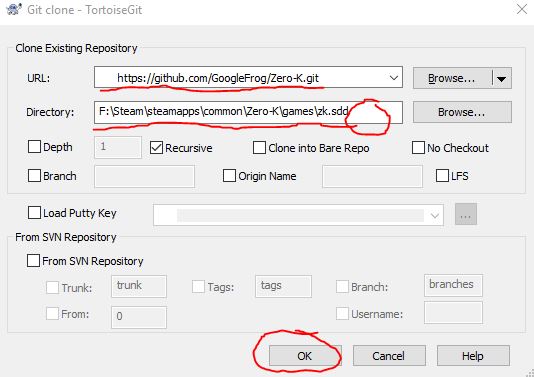
- Copy the web URL into the 'URL:' field of the clone interface.
- Ensure that the 'Directory:' field ends in 'zk.sdd'. It is likely to automatically contain the path '...\Zero-K\games\zk.sdd\Zero-K' so be sure to delete the '\Zero-K' at the end.
- Wait for the sources to download.
- Your 'zk.sdd' folder should look something like the image above.
Modifying the game
- For personal modding, see Mod Creation
Follow the instructions in 'Getting sources' the download the Zero-K game sources. Feel free to inspect and edit the game files. Most developers using Windows edit lua files with Notepad++.
To test your changes:
- Create an empty file named 'devmode.txt' in the same directory as Zero-K.exe.
- Launch Zero-K.exe.
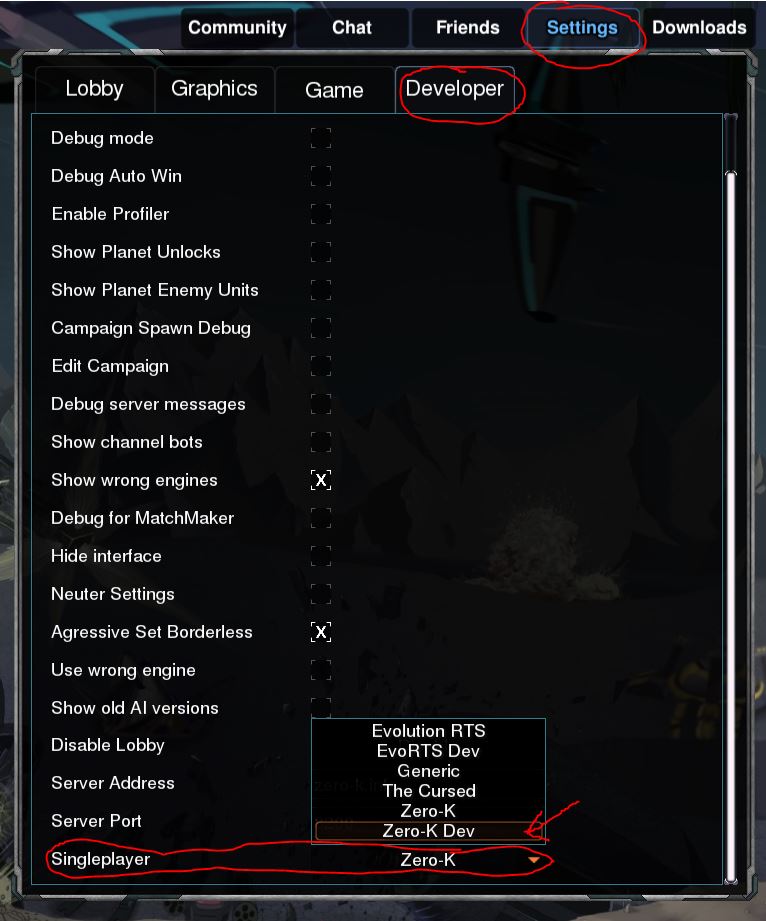
- Select 'Zero-K Dev' in Settings -> Developer -> Singleplayer (you may need to scroll down).
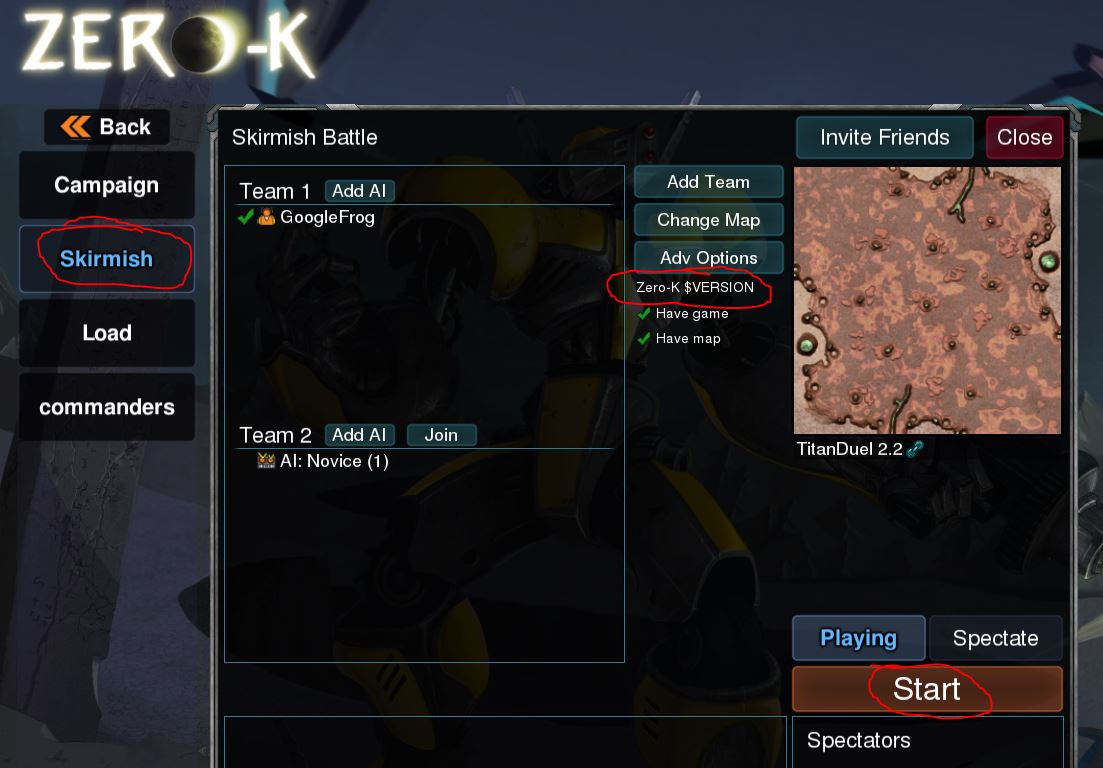
- From the main menu select Singleplayer -> Skirmish -> Advanced -> Start to launch a test game. Note that the game type should be automatically set to 'Zero-K $VERSION'.
- In the game, press F8 to open debug console. It'll display errors and output to the log.
To submit your changes:
- Commit your changes by right clicking on 'zk.sdd' and selecting 'Git Commit'.
- Write a description of the changes and click 'Commit'.
- Right click on 'zk.sdd' and select TortiseGit -> Push.
- Enter your GitHub login and password when prompted. The changes should now appear on your fork in GitHub.
- Navigate to https://github.com/ZeroK-RTS/Zero-K/pulls and click "New Pull Request".
- Click "compare across forks" to make your fork visible.
- Set the head repository to be your fork.
- Write a title and description, then create the pull request.
This creates a proposal to apply your changes to the main game. Be sure to check up on it and respond to comments.
Follow the instructions in 'Getting sources' with the following adjustments:
- The repository that you want to edit is https://github.com/ZeroK-RTS/Chobby.
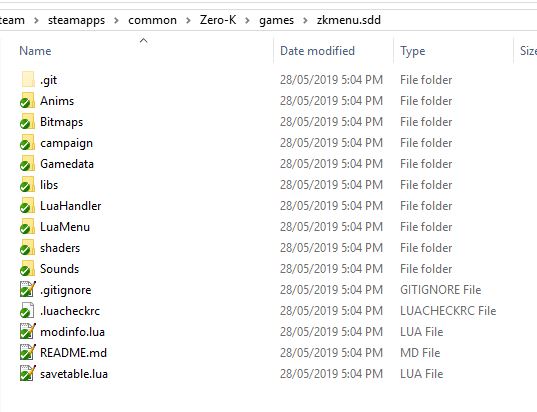
- It is best to call the folder something like 'zkmenu.sdd', to avoid confusion.
Make sure that the 'Directory:' field ends in '.sdd'. You should end up with something like this:
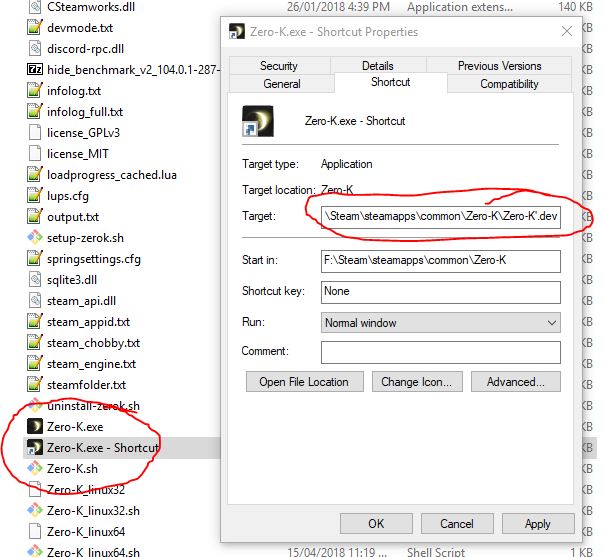
To test your changes launch Zero-K.exe with the dev arg (i.e. Zero-K.exe dev). On windows this is best done by creating a shortcut and changing the target, as shown below.
Zero-K.exe launch flags
Zero-K.exe [rapid tag] [engine version]
Note that the engine specified in arg won't automatically use the main Zero-K folder as its datadir. Add a springsettings.cfg file to the engine version's folder with the tag SpringData = path_to_Zero-K_folder
Modifying infrastructure/tools
- Install Visual Studio Community edition
- Install SQL Server express
- Clone to desktop Zero-K infrastructure
- Test by opening Zero-K.sln in Visual Studio
Initializing Website Database
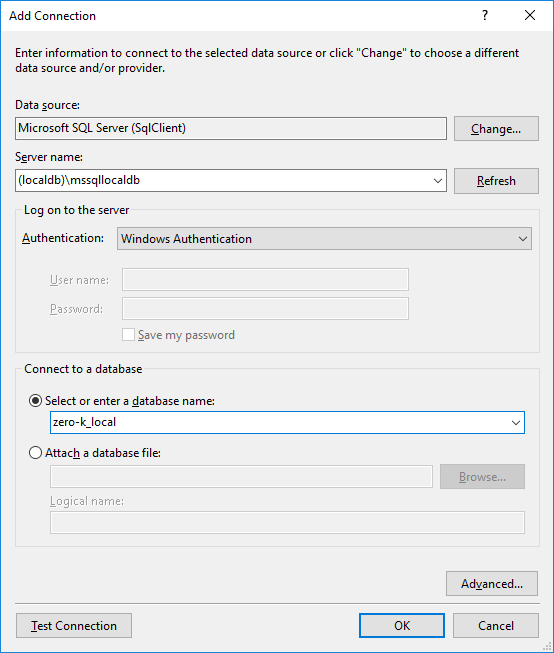
You may need to setup the database connection for the website. In order to do that: Open Visual Studio, open the Server Explorer panel, right click Data Connections -> Add Connection -> Sql Server. Enter (localdb)\mssqllocaldb in the Server Name field, after which zero-k_local will appear in the dropdown list of databases.
Debugging infrastructure
- To run a project right click it, choose "set as startup project" and hit F5 to run using debugger.
- You can enable multiple startup projects to test entire infrastructure locally (game servers, lobby etc). Enable asp.net, springie and ZeroKLobby projects to test it all together. Setup
- To run asp.net:
- It's required that you install MS SQL Express on your local PC. Get one from here. The file you will need is called SQLEXPR_x64_ENU or SQLEXPR_x86_ENU. Make sure you install version that matches your version of Windows (i.e. x86 vs x64). During the installation leave all the parameters default except that I changed server name to SQLEXPRESS in one of the first steps of wizard.
- Right click asp.net -> properties -> web -> check "Specific Page" and leave it blank. Otherwise you get errors when trying to host locally.
- Make sure SQL Server is running (check the Sql Server Configuration Manager in the Start Menu). If you can't connect, edit the data source for
ModeType.LocalinGlobalConst.csto say something like:Data Source=<hostname (usually your computer name)>\SQLEXPRESS
Artwork
See Development Artwork (outdated)
Missions
Campaign
Campaign planets/missions are defined in Chobby/campaign/sample
Standalone missions
Updating PlanetWars for new round
- TODO
Changing faction:
- Faction ID, name, color in dbo.Faction
- Faction blurb Faction<Name> on sitewiki
- Add/change icons if needed
- Site: img/factions/<name>.png
- Game: LuaUI/Configs/Factions
- Chobby: LuaMenu/Images/Factions
- Does chobby download them automatically? Presumably not
Using Planetwars admin interface: Change to a different galaxy if desired, reset PW
Wiki
See Editing Help
Unit pages
Part of each unit page is autogenerated by the Unit Guide tool, and uploaded by the Wiki bot.
Run export_unit_templates.sh to generate wiki templates for each unit (see export_unit_templates.lua for some configuration options), then have the bot read the generated text files and edit the unit pages accordingly (requires Visual Studio setup as detailed above). The text output can also be used to manually edit pages.
Unit buildicons and radar icons should be uploaded by FTP to manual.zero-k.info (zero-k.info/zkmanual/www/unitpics and /icons respectively). Contact Licho or Histidine for login details.
itch.io builds
Instructions for updating the portable build on itch.io:
- Download latest Zero-K portable from https://zerok.itch.io/zero-k, extract to a folder
- Download butler (see guide at https://itch.io/docs/butler/)
- Modify extracted portable folder so that its contents are the same as what the user will download
- Run butler with command:
butler push <portable folder> zerok/zero-k:portable
